GSTR-5 is required to be filed by the Non-resident taxable individuals every month through the GST portal. This section discusses what it is all about and for, and how to file GSTR-5 online.
GSTR-5 is for the ones registered under the GST regime and are non-resident. It seeks the detailed dig into inward as well as outward supplies in the guise of the business. One, who is an eligible taxpayer, can simply access and download the GSTR-5 in the form of a PDF format file and fill it out.
The non-resident taxpayers who are not in the ownership of any business in India but address supplies there for a short span of time are liable to make payment of tax under GST. They have to pay tax along with the interest, charges, and penalty within 20 days of the tax period being desisted or subsequent to 7 days of the validation span of registration, whichever option falls earlier among these two.
What is GSTR-5?
GSTR-5 is a type of GST Returns brought to execution by the Government. This GSTR under return form has to be filed by the non-resident taxpayer for the span of time within which he commences business practices.
Who is a Non-Resident Foreign Taxpayer?
Non-Resident foreign taxpayer refers to the supplier who is not in possession of any business in India but has visited the country for a short span of time to make supplies here. Such individuals need to input details and information related to all taxable supplies in the document called GSTR-5.
Why is GSTR-5 Important?
GSTR-5 is an important document for the non-resident taxpayers as it is constituted by all the information regarding them with the inclusion of the details related to sales and purchases. This information from GSTR-5 is forwarded to the GSTR-2 for the buyers.
Features of GSTR-5
Let us understand this part of the series by reading on the features and functionalities it goes by. While on the surface we already know what it is, here are the prominent features of GSTR-5 that tell us why it is exactly-
- It is a GST return form for the ones who are registered as non-resident foreigners commencing business in India.
- Any non-resident foreign person accentuating business in India can enlist under GST via a temporary registration for a particular validity time.
- GSTR 5 has to be filed every month and one also has to pay the tax (which also includes the penalty, interest, fees, etc.) every month (for the registration stage) by the 20th of the next month for a specific tax period or within the seven days of the validity period of registration being ended.
- The information of outward and inward piles have to be furnished in a single form.
- The taxpayer can file the GSTR-5 form directly or at a Facilitation Centre
When the Non-Resident is Registered Under Section 27
The registration, here, refers to a specific certificate that is specially devised to be issued to a non-resident taxable person or a casual taxable person. It is temporary and is treated valid for the period as specified in in the application or for the span of 90 days from the date of registration effectively, whichever is earlier. The individuals in this scenario can commence taxable supplies after the certificate of registration has been issued. The non-resident person has to file GSTR-5 within the period of 7 days from the last day of the registration period.
Details to be Furnished in GSTR-5
GSTR-5 consists of 14 headings that are prescribed by the government. Let us take a look at the details in GSTR-5 that are required to be included by the person.
- GSTIN
Firstly, you will provide your GSTIN. In case you do not have one, then using the Provisional ID will do.
- Name of the Taxpayer
You have to insert the name of the taxpayer with legal as well as the trade name.
- Validity Period of Registration
The detail regarding the validity period will be auto-populated.
- Month & Year
You need to input the relevant month as well as the year for which GSTR-5 is to be filed.
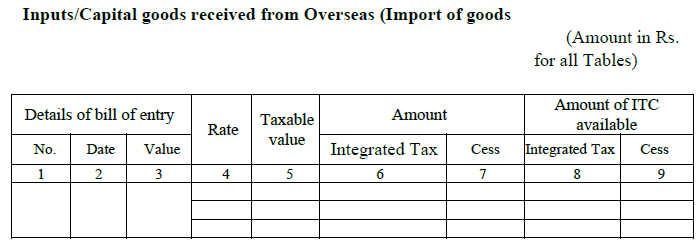
- Inputs and Capital goods that have been received from Overseas
The non-resident has to report inputs as well as capital goods that have been imported to India. Details regarding the Bill of entry and IGST, rate of tax, cess paid as well as the amount of ITC that is available.
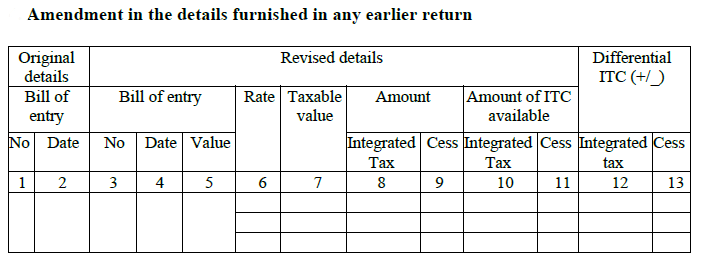
- Amendment in the details mentioned in any earlier return
In this section, the non-resident can make changes in any details that are there in imports that have been furnished in earlier returns. Here are the fields where you can make changes-
Bill of entry
Rate of IGST
Amount of ITC now available
Taxable value
Amount of IGST & Cess
Differential amount of ITC (if the excess is to be reversed or vice versa)
You must note that it is necessary to provide both original as well as revised details about the Bill of Entry.
- Taxable outward supplies that have been made to registered individuals (with UIN holders)
This heading will be studded with the invoice-wise details about B2B sales in India. It includes the sales to UIN holders. Details regarding the IGST and CGST and SGST and Cess along with the State has to be mentioned.

- Inter-State taxable outward supplies that have been made to unregistered individuals in which the invoice value exceeds Rs 2.5 lakh
In this heading, there will be the information related to the B2C large sales- inter-state sales (in which the invoice value is more than the amount of Rs 2.5 lakhs) to unregistered individuals.

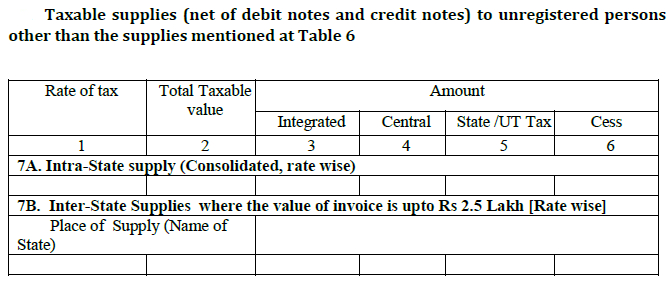
- Taxable supplies (net debit and credit notes) made to unregistered individuals- other than the supplies that are mentioned in Table 6
This heading will feature the details regarding sales made to unregistered dealers (B2C Others). Both intra-state as well as inter-State sales that are less than 2.5 lakhs are be inserted here. You can mention intra-state sales in a consolidated summary. Inter-state sales have to be mentioned state-wise.
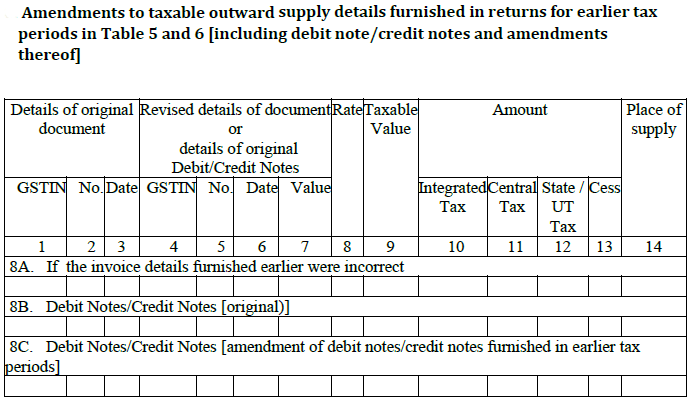
- Details regarding amendments to taxable outward supply to be mentioned in returns for earlier tax (in Table 5 and 6) with inclusion of debit/credit note as well as amendments thereof
This heading features any changes that are there in details of B2B and B2C Large for previous months. Original debit and credit notes that have been issued during the month have to be furnished here. Amendments to invoices and debit notes & credit notes that are issued will also come here. Original details will be mentioned in case of revisions.
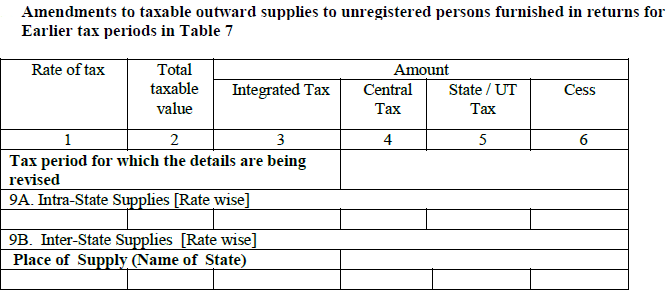
- Details on amendments made to taxable outward supplies for unregistered individuals to be mentioned in returns for earlier tax periods ( in Table 7)
This heading will bear changes in details about B2C sales that took place in previous months (originally mentioned in Table 7). You can mentioned details on intra-state sales in the face of a consolidated summary. Inter-state sales will be mentioned state-wise.
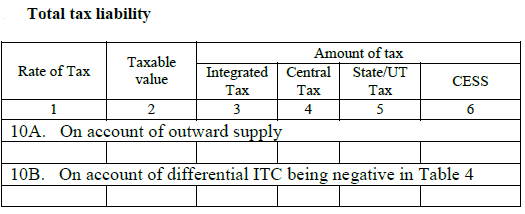
- Total Tax Liability
This heading will be furnished with the total tax liability.
- On account of outward supply- In this subheading, there will be details on tax liability in regard with r outward supplies for the present month.
- On account of any ITC being negative (in Table 4)- In this subheading, there will be details on additional tax that are to be paid due to the ITC reversal (i.e., any different ITC being negative) upon changes in any imports during earlier months (Table 4).
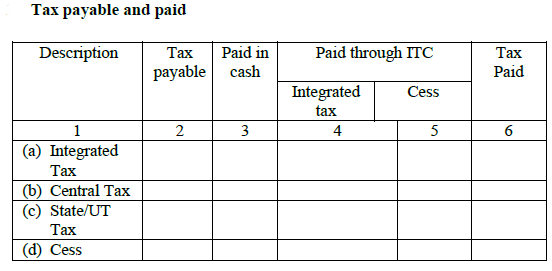
- Tax payable and paid
This heading will feature the details and information on tax you are paying in the month. Here, the breakdown of IGST, CGST along with SGST & Cess will be displayed. The taxpayer can choose to make payment through cash or using ITC.
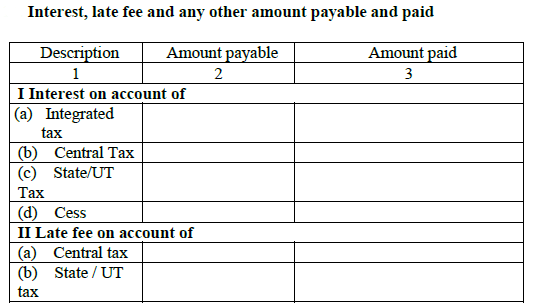
- Interest, late fee as well as other amount that is payable and paid
This heading will come forth with details on interest as well as late fee due and that has been actually paid on account of the return that has been filed late.
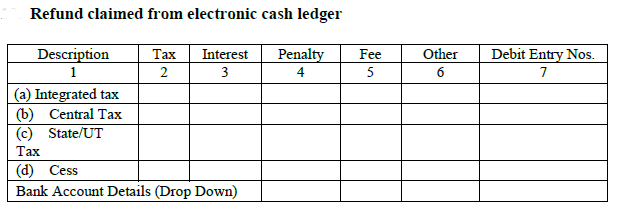
- Refund that has been claimed from the electronic cash ledger
This heading will bear the details and information on all refunds that have been received into electronic cash ledger. There is a drop down displayed in order for the selection of the bank account the NR wishes to receive the refund.
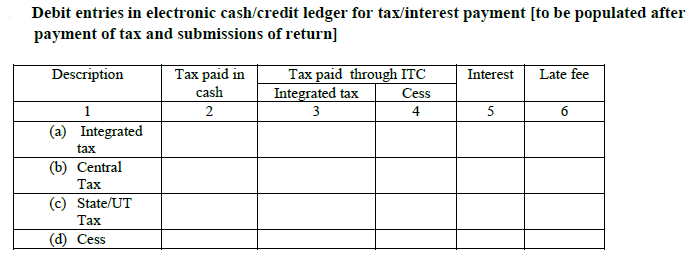
- Debit entries in electronic cash or credit ledger for tax or interest payment [they are to be computed post the tax payment as well as submissions of return]
Here, the debit entries under the electronic cash ledger,(cash outflow for payment of tax or interest or late fee) will be shown. The details are populated after the tax payment and submissions of return.
In the final go, these details will be scrutinized and validated by the authorized signatory. Authorized signatory means the representative of the non-resident and a person resident in India carrying a valid PAN.

Who Can File Form GSTR-5- Conditions for Filing Form GSTR-5
Mentioned below are the conditions that one has to match in order to fill Form GSTR-5-
- The taxpayer must be enrolled under the category of a Non-Resident taxable person.
- The taxpayer must contain a valid GSTIN.
- The taxpayer should carry a valid user ID along with the password.
- The taxpayer should carry valid and non-expired or a non-revoked digitized Signature.
GST Payment
When the non-resident taxable person has to make a payment of GST, a GST payment receipt must be made on the official GST portal and its payment can be commenced either through bank transfer or credit card/debit card or using a deposit of cheque/ demand draft.
It is to be noted that most of the taxpayers do not have to make payment for GST every month until and unless the credit that is there in the account is exhausted. It is due to the requirement of GST payment that is made in advance during the time of GST registration by non-resident taxable persons.
How to File a GSTR 5 Return
Know that one file GSTR 5 returns online on the GST Portal. You can simply prep up a GSTR 5 return based on the invoices that have been issued and the GST ITC (Input Tax Credit) that is available. It can be done right on the GST portal via an API.
Online Process to File a GSTR 5 Return on GST Portal
You must follow the steps mentioned below in order to file for a return in Form GSTR-5 via GST portal-
Step 1: Visit Official Portal- You first have to head to the official online website of the GST department.
Step 2: Input Login Details- Once you are there, put your valid credentials in the given field in order to login to the GST page.
Step 3: Select the Type of Service- In the next step, you need to hit the “Services” tab after which you will have to choose return dashboard in the menu return.
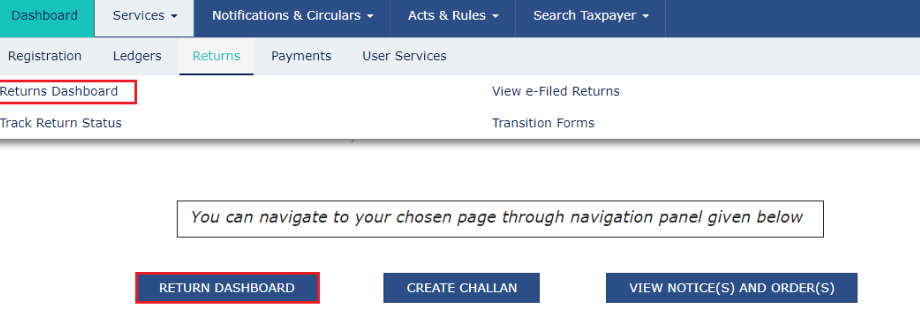
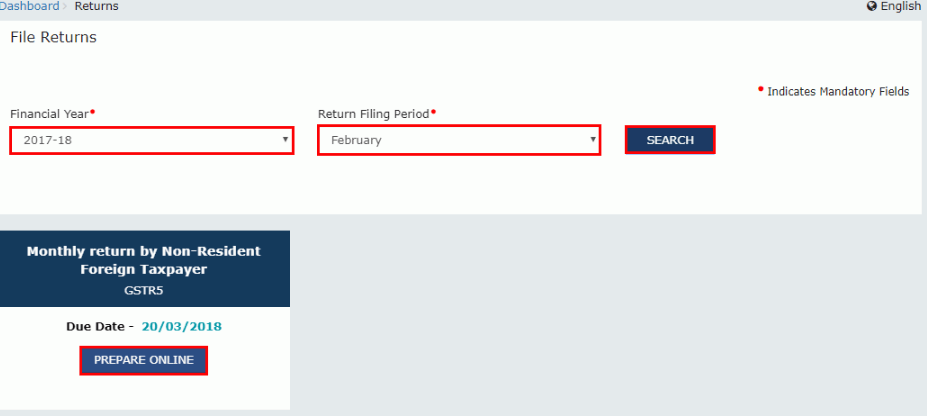
Step 4: Now you have to choose the “Financial Year & Return Filing Period” or Month for which you wish to file a return. In the drop-down menu, you have to make the selection after which view the file return page that is displayed and hit the “Search” button.
Step 5: Hit the “Prepare Online” button in case you want to equip the return with all the necessary entries on the GST Portal.
Step 6: Click on the Generate GSTR-5 summary button at the bottom of the page to view the details of auto drafted supplies of goods or services.
Step 7: A successful message will now be generated on the new page.
Step 8: After that, you finally will be able to land on the blocks which will be there in the table and input the relevant details such as original and amendment details.
Step 9: Now you have to hit the “Import of Goods” block in order to furnish it with the details of inputs or the capital goods that have been received from the overseas side and then hit the “Add BOE” option in order to add a new invoice.

Here, you have to put in details such as the bill of entry number, port no, bull of entry date along with the bill of entry value. These details will come in the boxes that are visible on the current page.
Once you are done doing that, hit the “Save” button in order to save the invoice details. Hit the “Back” button in order to see the count of invoices that have been added along with the total value of tax and liability and the available ITC in total.
Step 10: Now click on the “Outward Supplies Made” block to enter details related to the taxable outward supply that have been carried out to registered persons. Hit the “Add Details” button. Hit the “Save outward supplies” button in order to save the details of the invoice.

Step 11: B2C Invoices- You have to click the “Add Details” option in order to mention the information in the block of B2C Invoices. Tap the “Add Details” button to proceed with Form GSTR-5. After you enter the correct details in the given field, save it by hitting the ”Save” button. Hit the “Back” button in order to see the count of invoices that have been added along with the total value of tax and liability and the available ITC in total.

Step 12: 7A and 7B-B2C (Small)- Hit the “Add Details” option to move on to adding the required details in the field of 7A and 7B-B2C (small). After you enter the correct details in the given field, save it by hitting the ”Save” button.

Step 13: 8B- Credit/Debit Notes- Now you have to click on the “Add credit/debit note” field and start adding the required details in the block after which you can hit the “Save” button. Note that here, you have to furnish the field with the Taxable Values to the several GST rates apply. Click on the Counterparty GSTIN option which is there under the Processed Invoices tab.

Step 14: 8B-Unregistered Credit/Debit Notes- Hit the “ Add Credit / Debit Notes” block and then, you can start adding the details related to the credit and debit notes in the given field. After that, you can hit the “Save” button.

You will be directed to the page were in before and will be able to view a message reading that the invoice has been added. Now, hit the “Back” button and you can see the count of Credit / Debit Notes that have been added.
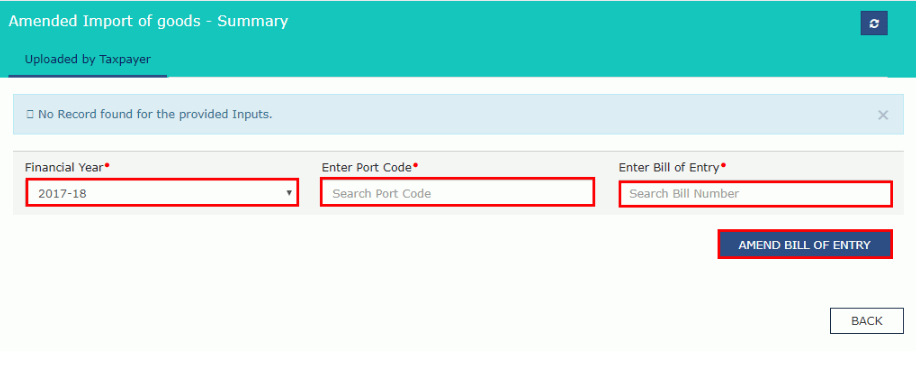
Step 15: Amended Imports of Goods- Hit the “Amended Imports of Goods” field in order to add details related to the amendments for the import of the goods. Click on the amend bill of entry after you input the required details. Perform amendments for the details and hit the “Save” button in order to save details related to the invoice.
Step 16: Amended Outward Supplies- Hit the “Amended Outward Supplies” block in order to fill in the details related to the amendments to outward supplies for registered persons. Then, choose the financial year after which you will have to input the invoice number. Then, click the “Amend Invoice” button.
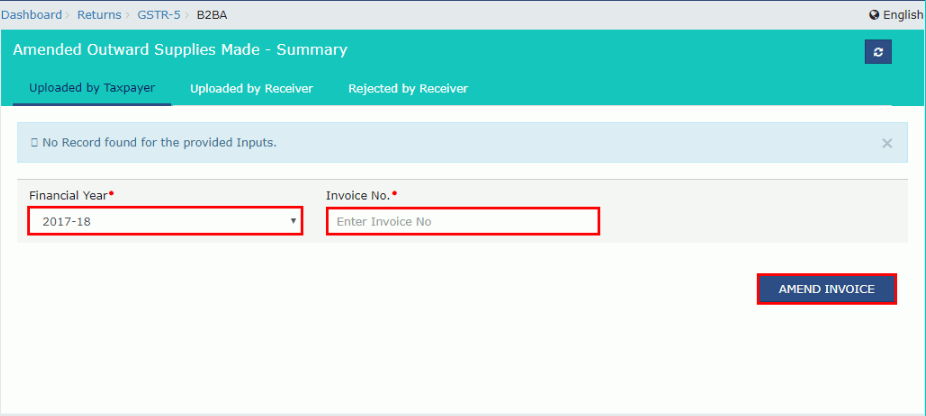
You now have to hit the “Save Outward Supplies” button in order to save all the details once you have filed the required information.
Step 17: Amended B2C (for large invoices)- You have to click the Amended B2C field in order to mention the details related to the amendments for outward inter-state supplies under unregistered persons. Then, choose the financial year after which you will have to input the invoice number. Then, click the “Amend Invoice” button.
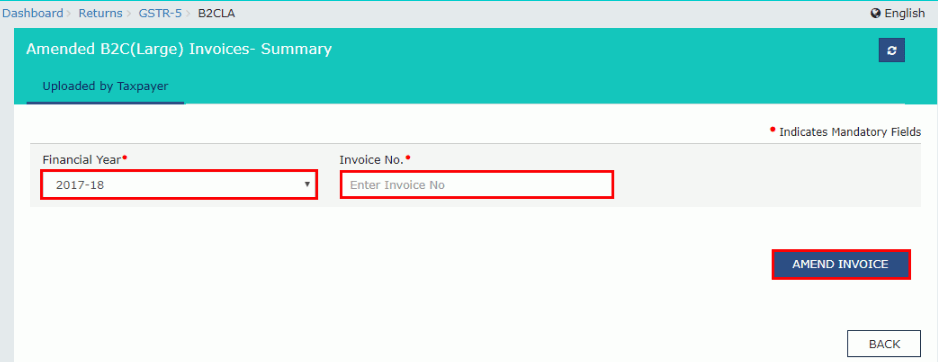
Choose the Form GSTR-5 and now, hit the “Back” button and you can see the count of invoices that have been added along with the total value of the invoice.
Step 18: 9-Amended B2C (Small)- In this step, you have to hit the “Amended B2C (Small)” field in order to add details associated with the amendments for outward supplies made to unregistered persons. Then, you have to fill in details related to the amended B2B(Small), a summary page displayed on your screen and hit the “Amend details” button.
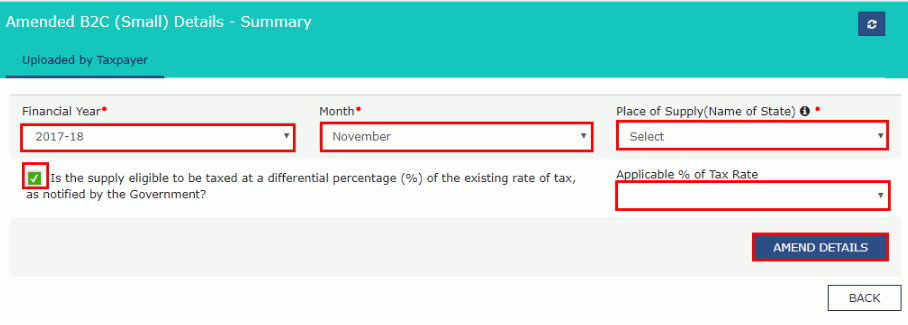
Now hit the “Save” button which will help you save all the details that have been added by you. After that, you can click the “Back” button and you can see the count of invoices that have been added along with the total value of the invoice.
Step 19: Amended Credit/Debit Notes- In this step, you can hit the “8C – Amended Credit/Debit Notes” tab and then add the details related to the amendments to Credit/Debit Notes in regard to the supplies under registered persons. Moving on, you have to choose the financial year and then, input the credit /debit note. Finally, you have to click on the “Amend Note” button.

Now you can hit the “Save” button doing which you will be able to save the details related to the invoice. After that, you can click the “Back” button and you can see the count of invoices that have been added along with the total value of the invoice.
Step 20: Amended Unregistered Credit and Debit Notes- Click on the “8C – Amended Credit/Debit Notes” field and then add the details related to the amendments to Credit/Debit Notes in regard to the supplies under unregistered individuals. You have to choose the financial year and then, input the credit /debit note. Finally, you have to click on the “Amend Note” button.

Now you can hit the “Save” button doing which you will be able to save the v related to the invoice. After that, you can click the “Back” button and you can see the count of invoices that have been added along with the total value of the invoice and total ITC, total liability and total taxable value.
Step 21: Preview of GSTR-5- Now that you are done with furnishing all the required information. You have to click on the “Preview” button. This will let you have the downloaded draft summary page on the GSTR-5 so that you can check it.
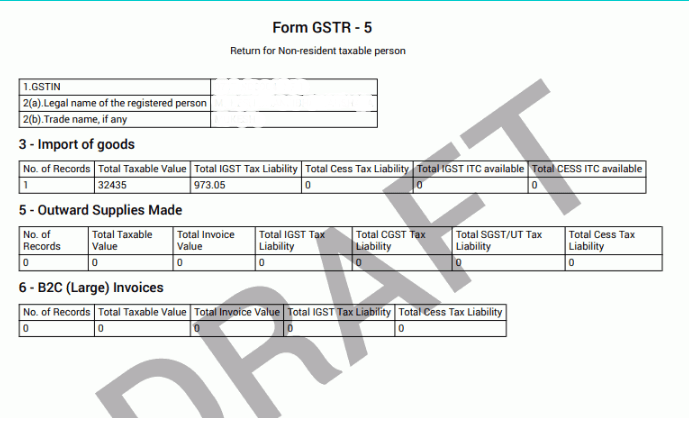
Step 22: Tax Liability 10A,10B- Then, you have to hit the”0A, 10B – Tax Liability” tab in order to check the details of the tax liability. These details will be there on your screen. You can hit the “Back” button in order to head back to the previous page.

Step 23: E-Acknowledgment and Submitting the GSTR-5- data- Here, you will select the check-box for acknowledgement confirming that you have gone through the preview details and the details submitted by you are correct. You will declare that you know that you cannot make any changes after submission. After clicking the check-box, click the “Submit” button.

A confirmation message will pop up on the top of the page. After the submission of the data, it will be frozen, and you will not be able to change any fields. Hit the “Preview” button again in order to download the GSTR-5 you have submitted in PDF format.
Step 24: Payment of Tax- Hit the “Payment of Tax” field. Then click the “Check Ledger Balance” button in order to check the balance available for credit under the Central Tax, State/UT Tax, Integrated Tax, as well as Cess. This will enable you to to inspect the balance before you make any payment for the minor heads.

The “Check Ledger Balance” page is visible on your screen, you can click on the “OK” button in order to move back to the last page. Then you have to present the amount of credit that is to be utilised. Click on the “Offset Liability” button so that you can pay off the liabilities. The tax liability will be offset after which you can hit the “OK” button once the confirmation message is presented.
Step 25: 11,12,14 Payable Tax and the Tax Paid- Hit the “11, 12, 14 – Tax Payable and Paid” field. After you carry out the payment of tax, the tax amount paid will be auto-computed in Table 11 with the total debit entry numbers that have been constructed on the use of cash balances and Input Tax Credit. Click the “Back” button to head back to the last page.
Step 26: File GSTR-5- Click the “File Return” button. The GSTR-5 Returns filing will be displayed. You have to tap on the checkbox for declaration. Then you have to select the authorised signatory’s name from the drop-down list. Hit the “File with DSC” button or the “File with EVC” button.
In the case of Filing with DSC, you must click the “Proceed” button. Then, choose the certificate and press the “Sign” button. In case of Filing with EVC- You will receive an OTP on your registered your email ID which you will have to enter. Then, tap the “Verify” button. The success message will be displayed. Hit the “Back” button.
Step 27: View GSTR-5 Status- Move to the “File Returns” page where you can select the Financial Year along with the period for Return Filing for which you have filed the Form GSTR-5. Then, you can click the “Search” button.
Due Date for Filing GSTR 5 Return
GSTR 5 return has to be filed before or on the 20th of each month by eligible non-resident taxable persons. In case of expiry or cancellation of GST registration, the final return GSTR 5 should be filed by the non-resident taxable person within 7 days after the expiry of GST registration. Upon the failure of GSTR-5 before or on the due date, there will be a penalty.
Apart from the penalty, there will also be a significant impact on the GST compliance rating of the concerned non-resident taxable person.
What Happens When GSTR-5 is Filed Late?
As per what has been specified by the GST Council, every late payment for tax will be charged with the provision of 18% of the tax rate that will be done on the annual basis. The charge will be levied on the GST taxation starting from the due date until the full payment of the same.
If a taxpayer fails to file his/her return during the time of the due dates as implied by the council, he or she has to pay Rs. 50 as a late fee per day in every SGST as well as CGST with Rs 25 each (if it is the case of tax liability). He/she must pay Rs. 20 with Rs 1o each for SGST and CGST (in case the tax liability is NIL). It is subject to Rs. 5000 that is set as a capped limit.
YOU MAY ALSO LIKE
Frequently Asked Questions (FAQ’s)
Where I can File GSTR-5?
click on the “Services” tab and then hit the “Returns” option. After that, you will move to the “Returns Dashboard” in order to get started with the procedure.
What is the condition for filing GSTR-5?
You only need to file GSTR-5 if you meet the following criteria-
- You should be titled as a Non-Resident taxable person.
- You should have a GSTIN.
- You should have a valid username and password.
When can I claim a refund?
There are certain scenarios in which you can claim a refund. They are as follows-
- You can claim a refund only in your last return which will be determined after the consideration of the extended period of registration. You can do it from Electronic Cash Ledger.
- You can only claim a refund from the way of Electronic Cash Ledger in case the Electronic Liability Register carry zero liability across all the major as well as minor heads.
What happens when you file GSTR-5?
Once you have successfully filed GSTR-5, an ARN will be generated. You will receive an email on your registered email address. In case you have provided your mobile number then you will also receive an SMS on the same.
Can a Non-Resident claim for a refund for taxes paid import of services?
Non-Resident tapayers cannot claim any refund for taxes paid on the import of services.


